If you want the best possible audio when working with voice over, it’s important to record as cleanly as possible. Often overlooked is the post-recording process. If you have a high quality recording, there’s still some improvements to be made. Perform these two tips for the highest quality:
- Always work with the highest quality audio file possible (never work with the same quality you are publishing in unless very high).
- Remove noise from your audio file.
Always work with the highest quality audio file
If you save your audio file in a low quality, then you can never increase the quality. It’s equivalent to setting your digital camera to 1 megapixel when it’s capable of taking 10 megapixel pictures.
Most programs can accept a WAV format audio file using 48000 Hz Mono (for spoken word or SFX)/Stereo (Music or SFX) and 16-bit (some programs can even accept 24-bit).
If you save your audio using this quality level, you have a high quality original and can choose a lower quality to export to.
The ideal format to publish for the Internet is 96 Kbps for spoken word and 128 Kbps for music (although you can get away with 96 Kbps for both).
Remove noise from your audio file – Adobe Audition or Audacity
Most audio editing programs have some sort of automated noise removal process you can run before editing your audio. To use this process, you need to have a quiet part in your audio, capturing nothing but steady ambient noise (no breathing).
Important: Before you start, record a few seconds of ambient noise to capture a Noise Print. Do not breath into the microphone or make any noise.
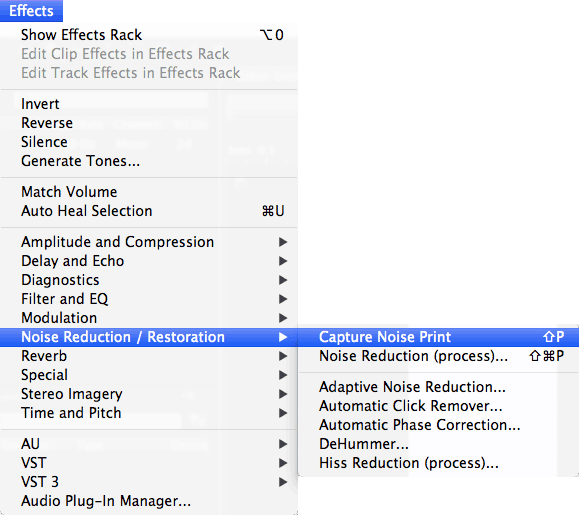
After you have your recording, use the following steps in Adobe Audition to clean up your audio file:
- Highlight the part of your audio where there is no audio recorded.
- Press Shift + P on the keyboard to capture the Noise Print.
- Highlight your entire audio file by pressing Control + A (Command + A on Mac).
- Press Control + Shift + P (Command + Shift + P for Mac) to run the audio removal process.
The process may take a few seconds to run but will remove the ambient noise from your entire audio file and drastically improve the quality.
If you’re using Audacity, which is free for Mac and Windows, complete the following steps:
- Highlight the part of your audio where there is no audio recorded.
- Go to the Effects menu and then Noise Removal.
- You must first click the Get Noise Profile button to retrieve the noise print.
- Close the Noise Removal box and highlight your entire recording (Ctrl+A or Command+A).
- Open the Noise Removal menu again (Effects > Noise Removal) and click OK.
You’re done! Now you have improved your audio significantly from the original record. I will follow up this post with tips on how to record professional sounding audio with minimal equipment.